Tuesday, November 13, 2018

Horseradish: Another Herbal Companion

Horseradish Armoracia rusticana

Since we are having such a mild winter this year I am just now getting to things that should have probably been taken care of sooner, like digging up the horseradish. Most of the roots will be transplanted, while some are brought indoors to clean up and store. 

The optimum time for harvesting horseradish in Southeast Texas is normally right before the first hard frost. Usually for us that would be right before Christmas. I love making hot tangy sauce with it during a holiday feast of fresh Gulf Coast seafood. 

We had a good frost this season, but I don't know how hard it actually was. At least it seemed mild compared to previous seasons. So here it is, the end of January and I'm just getting around to this task.

Horseradish is a hardy Perennial for zones 3 to 10. I hear a lot of people only grow it as an annual because of its spreading nature. Not here at Thyme Square Gardens. Yes it spreads, but not terribly and it has a multitude of purpose for us.

The Horseradish is actually a member of the mustard family. I mention this because mustard is a well know trap crop used commercially and can be used for the same purpose in a garden as long as it is monitored during certain life cycles of different insects.

.
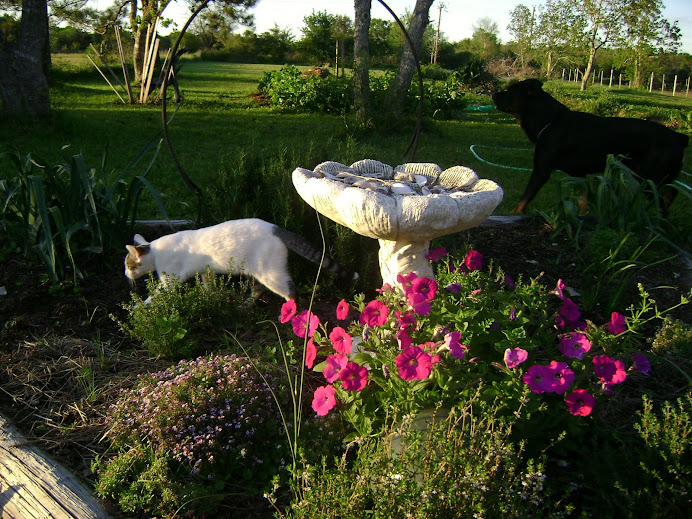
In the forefront of this garden path, on the right side you will see one of our horseradish plants. The foliage has long tooth shaped fronds that looks as though it belongs in the tropics. This plant was cut back severely earlier this summer as it became full of harmful insects. It carried everything from cabbage loopers to several varieties of beetles.The bad insects love this plant. The Horseradish was my night in shinning armour and protected my more valued vegetables in the garden. And actually that is my dog Han's doing his favorite job by chasing a cat out of the garden.

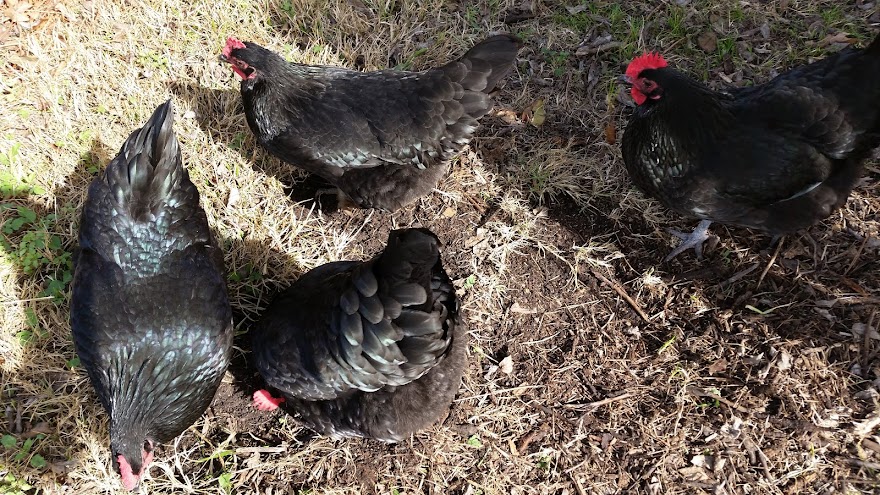
When using trap crops throughout the garden you must keep a keen eye on them during certain periods when they are doing their jobs. I monitor trap crops very carefully. This Horseradish was cut all the way back and I carefully carried the leaves to the end of the path where the chicken coop is. It is a squawking feast and my troubles are gone. This photo was taken mid summer where the plant has fully grown back with happy and healthy leaves free of insects until next spring. None of the roots of the plant are ever affected by any of this endeavor. 

Every year I dig and move them around as we do our annual crop rotations. Many horseradish roots will be planted near and in the potato beds to keep the Colorado Potato Beetles away, although I have never seen one in my garden.

It is a very easy plant to grow. Find at least 6 nice roots at your local nursery. Plant them in full sun, although they don't seem to mind if they get a little partial shade from other plants. Be sure your soil is nice and loose and well composted.

I find a peaceful comfort knowing that I have companion plants throughout the premises working for me and my garden.

Here is an easy way to prepare my favorite Horseradish sauce.

 
Ingredients:
1 C fresh organic horseradish root, peeled and diced in small pieces 
as needed cold water
2 T white vinegar
1/4 t salt
small covered glass jars
blender or food processor

Whip it up and store in the refrigerator. It usually lasts about 3 months.

Happy Gardening!!
Pammy


Tuesday, October 16, 2018

Mexican Hot Chocolate In A Mason Jar

The kitchen gardens bountiful summer harvest of herbs are hanging about drying for winters use. The fragrances fill the air indoors as we begin to settle in on some chilly fall nights.  The aroma beckons their use in that first warm cup of homemade cocoa.  Who am I to argue with such things? It’s time to pull out the mugs and teapot.

The special blend for this cocoa stems from the history deep within the Mayan Indians and preserved among the Mexican People. Using a Mexican chocolate called Ibarra gives the cocoa a sweet touch of cinnamon. The final touch is an infusion made from the herb Mexican Mint Marigold. Also called “Texas Tarragon,”  the herb gives the cocoa the faint southern flavors of anise and licorice.

Mexican Mint Marigold comes from high within the mountainous regions of Mexico. It’s the perfect herb to grow in the southern regions where Tarragon simply won’t grow. The perennial is very drought tolerant and makes a beautiful display in our kitchen garden during the fall months. The tiny golden yellow flowers are among the last to bloom before frost still providing food to the honeybees. If harvested while the flowers remain on the stalks and hung to dry adds extra beauty to garden and herb crafts.

Simply add your cocoa to a mason jar and decorate with a sprig of Mexican Mint Marigold or your favorite mint, along with a couple sticks of cinnamon. Tie it on the mouth of the jar with a piece of jute rope or raffia. They make a simple and elegant gift to give during the holidays.

Mexican Mint Marigold (Texas Tarragon)

Mexican Cocoa

Ingredients

1 cup unsweetened cocoa powder
1 cup powdered milk
1 cup firmly packed brown sugar
1 tsp. salt
1 tsp. cinnamon
3/4 cup chopped Mexican chocolate (Ibarra)

Optional: pinch of dried Mexican Mint Marigold finely crushed

I put a couple nice size teaspoons of the cocoa mix in my favorite chocolate mug and sprinkled a small pinch of Mexican Mint Marigold on top. Just pour on some hot water and enjoy the warm Mayan Indian chocolate flavor.

Happy Gardening!
Pammy

Monday, June 11, 2018

Canning Crispy Deli Style Claussen Pickles


These are MY Favorite Pickles!!!

Please remind me to not skip growing pickling cucumbers ever again!! The reason they make such great pickles is because the seeds are very tiny and the skins are a little tougher than a lot of other types. This keeps them much crunchier and the flavor is perfect!

This is an older post from me that I thought needed a little updating. I actually use a pinch of Stevia to replace the tiny bit of sugar that went in the original recipe. You might find me doing this a lot with many of my recipes. :)

My new Heritage Green Vintage Mason Jars

With the fact that I still actually have fresh dill growing in our hot Texas garden and I even have some of our garlic left that we grew last fall makes this recipe all the yummier.

The problem is I have to wait at least 7 to 10 days before they are good and ready to eat! But that's okay, these are so easy to make because they go straight to the refrigerator. 

I hope you've saved some nice big pickle jars to make some of your own. If not just use some good old fashion wide mouth quart canning jars.

I'm excited, because I just got the Heritage Green Vintage Mason Jars. I thought they might make my pickles a little prettier. The important thing is to make sure you have the space in your fridge for the jars. I had to clean mine out, HA!! That's right...and not a huge surprise that it needed it too!

If for some crazy reason you have never eaten a deli style pickle...just know this...they make the most excellent pickle to go with a homemade sandwich. And since I love making my own bread, especially my French Sesame Buns, a healthy hearty sandwich makes a delicious meal with an excellent pickle..

 Ingredients

For The Brine
(I've broken this down for you, so if you need more brine just increase the amount you are making) Remember the brine will stay good in the refrigerator for a long time to be used later as well. So if you end up making to much its really not a problem. You may also chose to use Canning Salt, but I say why? when your making kosher pickles!
3 Parts Distilled Water, 1 Part 5% white distilled vinegar and 2 Tbsp. of Kosher Salt

For The Spices and The Goodies. 
This list is for quart size measurements that would be placed in a single quart size jar. If you are using larger jars for your pickles, just adjust it accordingly.

1 garlic clove, minced
1/4 tsp. fresh peppercorns
1/4 tsp. fresh mustard seed
1/4 tsp. whole allspice, or 1/8 tsp. ground allspice
1/4 tsp. red pepper flakes
1 dill seed head, include some weed and some stems (dill seed alone can be substituted) 
A pinch of turmeric
1/4 tsp. sugar
Pickling Cucumbers, small whole or larger halved or quartered

Directions

Combine the ingredients for the brine and bring to a boil. Be sure to use a non reactive type of pot for this. Something like a stainless steel or enameled pot works great.

Put all the spices and goodies in your jar or jars. Fill them tight with your pickling cucumbers. Make sure to leave at least 1/2 inch head space from the top of the jar. Pour your hot brine into the jars. Wipe the rims and put on the lids. Let cool to room temperature before placing in the refrigerator. The pickles will keep for up to 8 to 11 weeks in the fridge. Ours never last that long and I bet they will keep much longer than this!


Happy Gardening!
Pammy

Friday, April 20, 2018

Beautiful Milk Thistle Silyburn Eburneum

Bloom of Milk Thistle Silyburn Eburneum

Oh, I just couldn't wait to show you this bloom! Earlier this winter I had written an article for Natural Family Today on naturalizing beautiful weeds and natives. The photo I used in the article was when this Milk Thistle was still an infant. Now it is about 4 1/2 ft. tall and nearly 3 ft. wide. I can't believe it!! I knew it was special from the first time I layed eyes on it and have anxiously awaited its crowing glory.

Needless to say, the article didn't get a whole lot of attention. I wasn't surprised since it seems to be a whole new concept for most folks to keep weeds in their gardens. Many people still don't understand that many weeds are so very beneficial for human health as well as for wildlife and diversity. So it is my hope as always, to maybe convince a few more gardeners to perhaps think twice about pulling them up.


As I glanced through the photos I had taken this morning, I thought to myself that it was almost as if heaven was shinning its light down upon this precious plant.

If we were to keep pulling up the Milk Thistle, such as this we could loose one of the most valuable resources in nature to heal the human liver. This plant is edible either fresh or steamed. Also the seeds are said to have a tremendous health impact for problems related to the liver caused by chemicals and toxins. Christopher Hobbs had written a very informative article for the Herb Companion, going into great detail on studies done in Germany on Milk Thistle. He also includes dosages and precautions for using it medically.

I hope to capture some more photos of this amazing plant with some activity surrounding it with our local wildlife. This plant offers much food for butterflies and birds, such as the Gold Finch that enjoys eating its seed. It is said that the Gold Finch also enjoys nesting within the plant. I certainly can see how it could protect the young nest with the sword sharp jagged edges of the leaves.

It is my desire to let this Milk Thistle naturalize with in my garden and so we shall keep you updated on its progress. I also want to welcome you to come and visit our Facebook Page and share with us some of your favorite photos of your beautiful weeds.

Happy Gardening!!
Pammy

Wednesday, February 14, 2018

Growing Organic Potatoes Made Easy

Red LaSoda Seed Potatoes

Valentines Day means more than just Cupids here in the garden. It really means Potato Planting Thyme in Texas!

Mr. Garden, also known as El Spud by some has the easiest system for growing clean and easy potatoes in raised beds.


This year it seems one of the several compost piles had lots of extra oak tree leaves. We always use what we seem to have the most in as far as organic material goes. Last year it seems it was pine straw that was used. 

Part of the raised beds get filled with leaves. Then as you can see, Mr. Garden tosses in some seed potatoes.


Then we get in there and space them in nice straight rows about a foot to 18" apart. Pretty easy so far!


Next he simply covers the potatoes with more leaves. 


Our four raised beds take about 6 lbs. of seed potato. Mr. Garden likes to buy them just the right size (smallish) so we have no need to cut them like you would for the really big seed potatoes.

All that will be left to do is to water them in and wait for them to grow. As they grow you will just simply add a bit more leaves on the top. 

Be sure to check out my potato harvest article from last year.Storing and freezing harvested potatoes.

Here's to a Fresh New Year and Bountiful Harvesting!

Happy Gardening!
Pammy

.

Friday, January 26, 2018

Chemical Free Gardening

Take The 3 Step Challenge To Chemical Free Gardening
The Monarch Caterpillar
“The 3 Step Challenge is designed to get you well on your way to a chemical free Garden.  Chemical free gardening is all about nature. The goal for every natural gardener is to bring nature back into balance. As this happens harmony will begin to replace the chemicals.” ~ Pamela Kimsey
How we approach natural gardening can be our greatest challenge. No one wants bugs to devour their vegetables. Nor do we want wild animals destroying all of our hard work.
The trick to changing our chemical dependency is in developing a new way of thinking. Instead of working against nature we begin working right along with it.
It is hard for first time gardeners and even old time gardeners who have always depended on the use of chemicals. Many changes will be taking place within the whole ecosystem of the garden. It takes time to overcome some of the challenges you will most likely be faced with.
We can prolong the actual progress of the balanced natural garden each time we use a chemical. This includes many organic chemicals and some of the homemade solutions, especially when used improperly.

First Challenge: Breaking the Habit

It is our nature to want instant results. When insects invade our garden our first instinct is finding the quickest way to get rid of them. With chemicals so easily available we usually grab one without thinking. There most likely was a natural solution.
Challenge: Patience! There are many factors to first consider. Research the problem and talk with experienced and successful natural gardeners. They love sharing tips and tricks.

Second Challenge: Get Familiar with Nature

This means to learn about things in nature. Get to know the bugs and the weeds common to your area. Some bugs are pests while others are helpful. Some weeds can be obnoxious while others benefit natural pollinators and wildlife in general. Get to know the things you cannot 'see that live in your soil. You will find harmful ones that live there as well as the ones you must have for healthy soil and plants.
Challenge: Wisdom! You're never to old to learn new things. Wisdom usually comes with practice. Find books on the subject and websites. Begin to notice the small things that are happening in your garden. The relationships between plants, the birds, the bees and the butterflies, the life cycles of insects and their natural predators. It’s all a lifetime of learning.

 Third Challenge: Trust Nature

Coming to realize that nature has always done perfectly fine all on its own before mans intervention is a great place to begin. Think of the natural forest and all that is within it and how it all works together from the tips of the tallest trees to the very ground beneath them. You can create the same perfect balance in your garden.
Challenge: Faith! The more you begin to take notice in even the smallest of things the larger your faith will grow. Once you’ve noticed a simple ladybug devour clusters of aphids on an infested plant and you didn’t need to do a thing to control the aphids you will be well on your way to balance and harmony in your chemical free garden. Nature truly is a beautiful creation handed to us to tend and care for in the most natural way.

Happy Gardening!

Pammy

Thursday, October 19, 2017

Ginger Snap Cookies


It is truly fall around the house when I bake the first batch of Ginger Snap Cookies. The fragrance of Cinnamon and Ginger always does the trick.

I've been making this recipe for about 23 years now since my mother sent me a cookbook that women from her church had made. The ladies name who shared this cookie recipe was named Laura Covey. I don't know her, but I thank her because it turned out to be my son's favorite cookie.

I also use these Ginger Snaps to make my pie crust for pumpkin and squash cheesecakes. I always have to hide some cookies so I have enough to make the pie crusts.

I never changed a thing in this recipe until recently. I decided to change up on using the Shortening. I found an awesome way of switching it that has worked out perfectly and much healthier.

When baking the cookies it is important not to let them get over done. They should still want to be almost to soft to lift off the cookie pan with your spatula. That way when they cool they won't be to hard and still have a soft middle.

Preheat oven to 375 degrees.

Ingredients

1 cup sugar
1/2 cup unsalted butter
1/4 cup coconut oil
1/4 cup Grandmas Molasses
1 egg
2 cups organic unbleached flour
1 1/2 tsp. baking soda
1/2 tsp. sea salt
1 tsp. cinnamon
1/2 tsp. ginger

Directions

Cream sugar and butter and coconut oil, add molasses and the egg. Sift salt, spices and flour, add to the creamed mixture. Stir and blend well.

Place cookie dough in the fridge until cold. One or two hours is good.

Roll dough into round balls about the size of a walnut. Roll them in some sugar and place on the cookie sheet about 2 inches apart.

Bake at 375 for 10 to 12 minutes. Check them while baking to not let them turn to dark.

Happy Gardening and Happy Baking As Well!!!
Pammy